Showing posts with label Free Pattern. Show all posts

Wednesday, December 24, 2014

Countdown to Knitmas: Day 24

Happy Christmas Eve!!! Time to BO and wrap it up. Of course, you had that all done days ago. Now you can cast on something fun to ring in the new year next week.

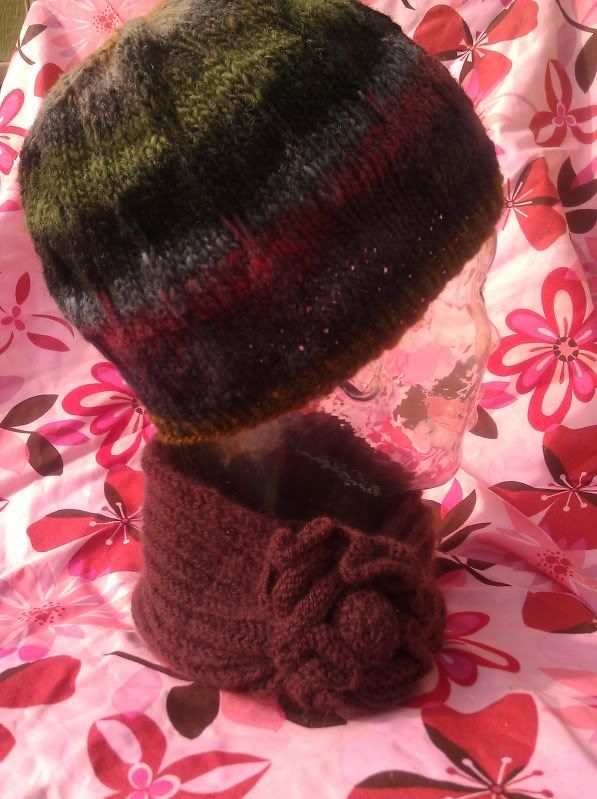
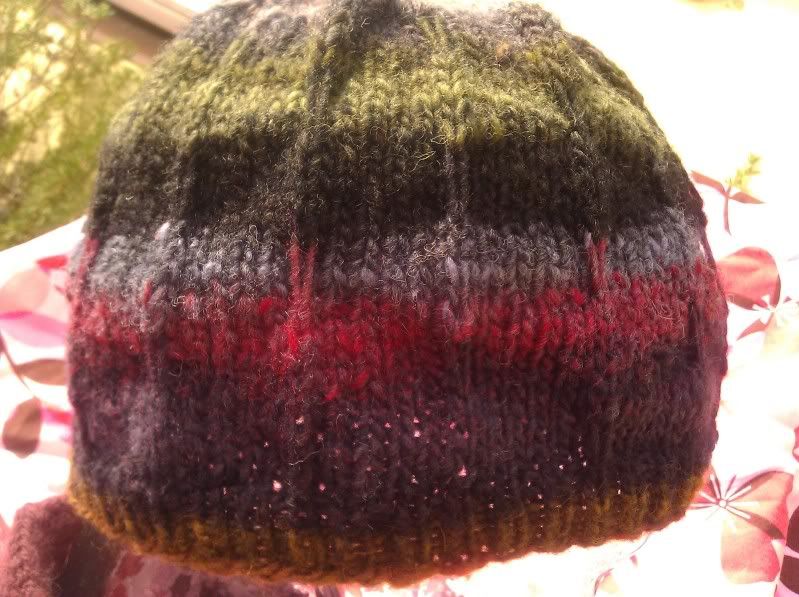
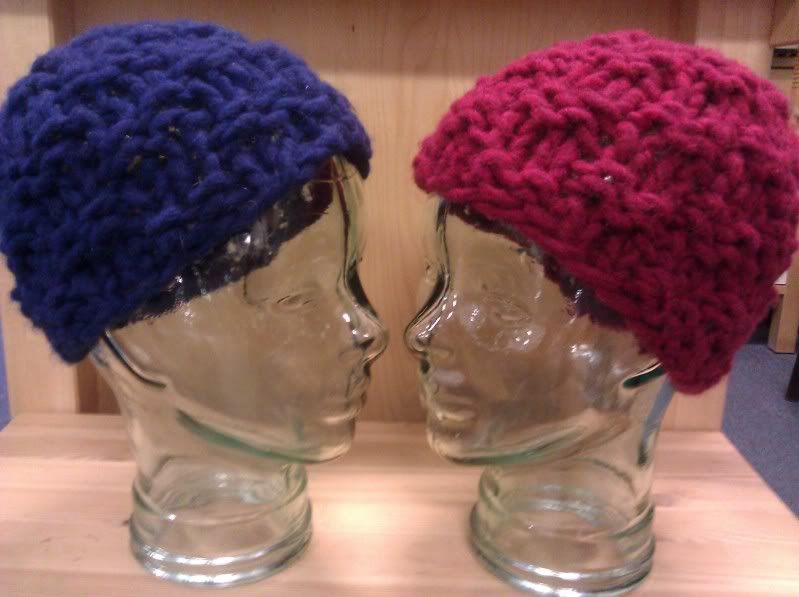
As usual, I have improvised a few hats this year and I would like to share my most recent one with you here. You could cast it on today (Lois will be in the store until 2pm). or on the 26th when we resume our usual hours. This hat pattern was whipped up for my husband to gift to a coworker. I started the blue one while we were watching the Hobbit on Wednesday night. With the unknitting time (a side effect of theater knitting) figured in, the hat took about 5 hours. With smoother sailing and not having to drop and correct some purls that had shifted during my ribbing, I think that a speedy knitter could knock it out in about 4 hours. (You know, just in case you need one more gift today.)


Yarn: approx 150 g of Sport weight yarn; I used Mirasol Nuna and had about 12 g left over
Needle: US 5/3.5mm 16" circular and matching DPNs
Gauge: approx. 20 sts=4 inches

CO 100 sts. and join in the round. Double check that you have no twist and place a beginning of the round marker.

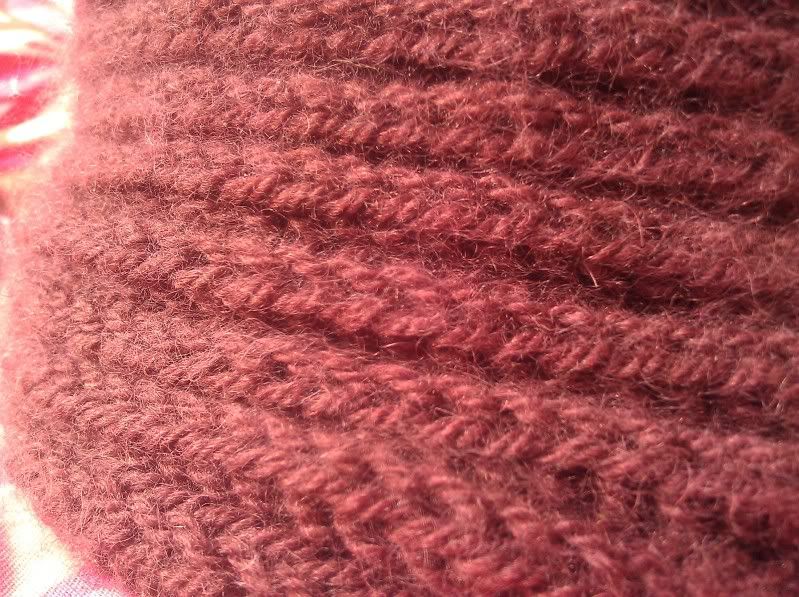
Rnd 1-9: *k2, p2, repeat from * around.

Rnd 10: *k10, m1, repeat from * around. (110 sts)

Rnd 11: knit
Repeat round 11 until your hat reaches the desired length. To achieve this slouch, I worked about 48 rounds (I would give you a measurement, but I gave the hats away without measuring).

Decreases:
Rnd 1: *k9, k2tog, repeat from * around. (100 sts)
Rnd 2: knit
Rnd 3: *k8, k2tog, repeat from * around. (90 sts)
Rnd 4: knit
Rnd 5: *k7, k2tog, repeat from * around.(80 sts)
Rnd 6: knit
Rnd 7: *k6, k2tog, repeat from * around. (70 sts)
Rnd 8: knit
Rnd 9: *k5, k2tog, repeat from * around. (60 sts)
Rnd 10: knit
Rnd 11: *k4, k2tog, repeat from * around. (50 sts)
Rnd 12: *k3, k2tog, repeat from * around. (40 sts)
Rnd 13: *k2, k2tog, repeat from * around. (30 sts)
Rnd 14: *k1, k2tog, repeat from * around. (20 sts)
Rnd 15: *k2tog, repeat from * around. (10 sts)

Cut the tail. Thread a tapestry needle and feed the remaining 10 sts. onto the strand like beads on a string. Pull it tight like closing a drawstring. Tuck the end to the wrong side and weave in ends.


Happy Needling,
Anne

Monday, December 22, 2014

Coutndown to Knitmas: Day 22

One day in November, I had a really cool moment while Bella and I enjoyed some Starbucks treats. There was a lovely lady waiting for her drink wearing a very cute scarf. I was doing my side ways quick glances to try to figure out how it was made and if it was hand made (if you ever catch me looking at you in a strange manner, it is because I am dissecting something interesting that you are wearing or carrying). Becoming more intrigued, I decided that I would simply give her the deserved compliment and ask her if she made it.
Turns out that she did make it. And, she was actually one of my past beginning knitting students. After the my embarrassment faded from my not remembering her out right, I pressed her further about her clever scarf. She was inspired by something she saw and improvised from that object. Here is Kari (lost the note where I made sure to spell your name right; hope I remembered correctly) wearing her inspired accessory -
So pretty. And the scarf, too.
Now, I am inspired by her scarf. I think that one could improvise using the famed 6st scarf times 3. Here it goes.

1. I am starting with US8/5mm needles and  3 colors of the same yarn, Classic Elite Classic Silk, 135 yds/50g, 50% Cotton, 30% Silk, 20% Nylon -

+

2. I am cutting 42 (14 of each of 3) pieces of fringe, using a DVD case as the guide. I will be placing a 3 strand fringe in 7 places on each end. 

+

3. Cast on 6 sts and work until the yarn is gone in each. I did not go as far as that. I stopped at 300 ridges or 600 rows each strip. I found that working each strip individually was the best thing as far as speed and yarn management. It is also best to work them to equal number of rows; since garter stitch is so stretchy, measuring can be unreliable. I used stitch markers to count every 50 ridges.


 4. To join the strips before braiding, I used the fringe. I inserted a crochet hook into each layer of fabric at their corresponding corners and pulled the fringe through.


 5. Then, I proceeded to braid. The strips were best managed during braiding if I kept them wound into balls.

 6. When braiding is complete, use the fringe and overlapping the ends in the same way to tack them together.

It is a thin scarf ,but It is also very long and I can wrap it a couple times. I am looking forward to trying it again with thicker yarn and perhaps different cast ons, maybe 8 or 10 stitches.

Happy Needling,
Anne


Saturday, December 20, 2014

Countdown to Knitmas: Day 20

We have a famous project that Lois composed long ago to teach a very large group of knitters the basics. We call this project the 6 stitch scarf. It has proved to be a big success with our beginning knitters directly after their first session.

It has many winning attributes, which are not limited to -
1. Very Quick Gift
2. Perfect Project to Teach a Brand New, Lamb Knitter (think gift that you don't have to make)
3. Good Place to Apply Fringe
and on and on.

Yarn: at least 66 yds of Bulky yarn (fringe is included in that yardage); we have used Malabrigo Rasta and Encore Bulky and had great results.
Needle: US 15/10 mm (Straight or Circular; your choice)

It is as easy as its name suggests. The first step may surprise you though - I cut 12 pieces of fringe and set them safely aside in my project bag. With the fringe cut, I can knit until about 1 yard remains for binding off (maybe 1.5 yds). I like to use a DVD case, wrap it around 12 times (long or short side), and cut one end open.

Now, the expected; CO 6 stitches. Work in Garter stitch (knit every stitch in every row) until the ball is nearly done (leaving 1-1.5 yds for BO). Bind off. Weave in ends and apply fringe.

We have a great deal on the correct size needle -


And, we have some really cute Serendipity needles in the correct size range (US 13-US 17).


Lois just made a new sample in a fun self striping yarn. Here she is casting on Sunday evening and she nearly finished it in about 2 hours.


Happy Needling,
Anne

Tuesday, March 25, 2014

Free Pattern!

Hi everyone! Remember a while back when I posted about the Knitted Wit Gumballs? Well I knit up a fun little baby hat with a few colors and wrote up a quick free pattern for you all!
download now

Click the link above to download the free pattern!

Wednesday, December 18, 2013

Countdown to Knitmas: Day 18!

Grandma Lecrivain gave my mom an important piece of advice that she made good use of as we kids grew up. As a household plagued with many bouts of hay fever all year, Grandma advised my mom to use a long athletic sock and a diaper pin in lieu of a scarf with a Vapor Rub, pinning that setup around our necks when we were tucked into bed. You may have had a similar treatment at home but with a scarf, but a scarf can be a bit of a tangle to sleep in and the sock is nice and close fitting without any extra to it. I always awoke feeling improved by the comfort of this care - still sniffling, but certainly improved.

For a while, when the sniffles hit our house, I have been meaning to make some cowls that would do the job of the athletic sock (nobody wears long socks at my house). It needed to be washable, warm, close fitting, and stylish enough that the sniffler could keep the comfort tucked around the collar as the day continues.

I present to you, in Spud and Chloe Sweater:


The Feel Better Cowl
Sizes: circumference - 20(22)inches, child(adult); height - 5 inches

Gauge: 4sts/inch and  rows/inch

Needles: US9/5.5mm 16 inch circular or the size needle required for you to achieve that gauge; Optional - DPNs in the same size as you circular needle for making the i-cord button loop right at the beginning (you can use your circular because it is just a few rows so it is not that annoying to use this tool for that job).

1 large button, approx 1 inch

Yarn: approx 80 yds of worsted weight yarn; my sample uses Spud and Chloe Swaeter (160yds/100g, 45% Organic Cotton and 55% Superwash Merino Wool) and I could get 2 cowls from one ball.

CO 3 sts. Work an i-cord for 10 rows. Insert the left end of you circular needle into spots along the cast on edge ("pick up" rather than pick up and knit"). Knit across these 3 sts.


Now, turn your work and cable CO 74(82) sts for a total of 80(88)sts. (If you would like to make this larger or smaller, respectively, add or subtract inches by taking sets of 4 sts. away. Then, your ribbing still works. If you go larger, then you may need more yarn.) Turn your work again so that the i-cord button loop is in your left hand and the yarn is coming from your right hand. Bring the tips together, making sure that there is no twist, and begin working in the round. Remember to place a beginning of the round stitch marker.

Round 1-4: *K2, P2, repeat from * around
Round 5-24: Knit.
Round 25-27: *K2, P2, repeat from * around
BO in pattern. Weave in your ends.

Sew the button to the cowl. I have been placing them about 4(5) inches to the left of the button loop (with the loop to the top) and in the center of the stockinette. To save having to break out the measuing tape, I would place the center of the button under the 4th(5th) set of purl bumps and then eyeball the center.


As you can see, I have them in in various stages of complete; six knitted and 6 to go.
The Comfort is for the non wool wearing recipient.

Happy Holiday Needling,
Anne


Monday, January 23, 2012

Week 34 of 52: Fringe Thyself Scarf

I was hurrying to finish a long overdue knitting debt of some scarves. One had been done for ages and was my inspiration for Still Waters. The second one was really hard for me to get back to finishing. I was recently reminded that these were long overdue and that helped move the knitting muses along, double time. I came up with a solution for using up the yarns that were to be mixed and for this week's project.

I dare not call this my design, because I have seen this design incarnated many times before my attempt. It is certainly my pattern, though. Such a subtle difference.

I am not easily enchanted by a novelty/fashion yarn, but this Aria has been calling to me since it arrived a few weeks ago. As I work with it, I am reminded of this really cool Missoni yarn that one of our knitters has been long laboring on a wonderful ruana for sometime (something wonderful, large, and chic on US 4 needles). (If you are reading this, dear knitter of the Missoni Ruana, how is it?)


I would like to share some of the many other patterns that also use this or a similar technique for fringing as you go.
Ribbon Triangle #1000 (this one is a sample that we have had for a long time)
Self-Fringed Scarf (Short ways)
Self Fringed Scarf (Long ways)
Voss Self Fringing Scarf (just one more pattern that makes me want the book that it comes from)
Koko Self-Fringing Shawl
Self-Fringing Bias Shawl/Scarf


Week of January 22 to 28:
Project: Fringe Thyself Scarf by Anne Lecrivain-Cozzoli
Yarn: 3 balls of Crystal Palace Aria (134yds/50g, 38%Rayon, 35% Merino, 18% Polyester, 9% Nylon)
Needles: US 8/5.0mm (I was going to use US 6/4.0mm, but one of my darling sons broke a needle while I was into the first attempt by about 1 inch.)
Size: approx. 7 inches wide by 68 inches long (width dos not include fringe)
Gauge: 4sts/in and 8 rows/in in garter stitch
Pattern:
Cast on 32 sts.
Row 1: Knit 4, place a marker(once this marker is placed, leave it in and slip it when you get to it), ktbl(knit through the back loop), knit to the end.
Row 2: Knit until one st. remains before the marker, ktbl, sm (slip marker), knit to the end
Row 3: Knit 4, sm, ktbl, knit to the end.
Repeat rows 2 and 3 until you have about 3 yards left at the end of your yarn supply. Also, end after having worked a row 3.
Bind off until the last 4 sts (after the marker) remain. Fasten off  the last stitch that was bound off. Now, the fun part: drop those last 4 sts all the way down the scarf. Do this step methodically, making sure that you have pulled out all 4 sts each row that you drop. Because you twisted the sts that border the dropped stitches, you don't have to worry about these drops coming undone or making your scarf unravel.
Notes:
1) If you want to check out your fringe as you go, then you can drop anytime. Do so at the end of a row  3. To recoup these dropped sts, cast on 4 more sts using the backwards/e-loop method onto the needle holding the sts. Then, carry on.
2) When adding a new ball, do so at the beginning of a row 3. Doing it at this point allows the ends to look as though they are a part of the fringe and you don't need to worry much about weaving them in later.

Here is the scarf that inspired this project:


If you are viewing this post far from driving distance from our store, then please remember that we will happily take phone orders. Call us @ (805) 654-9500. (There will be a postage charge for shipping.) Also, I want to mention that we have refined the 10%off sale to apply when you are buying the yarn for the featured project.
P.S. If this idea really lights you up, then you can also join a ravelry group here.

Wednesday, January 11, 2012

Weeks 31 and 32 of 52: Flower Scarf and Slippery Hat

In the course of choosing my yarns, I ended up making a kind of pretty coordinating set. Both are lots of fun to make.
#31:
The Flower Scarf is a really lovely way to try out an easier way to get a basic brioche look by doing the fisherman rib. This rib uses a technique called knit one below, which , if you like, there is a whole book filled with lovely things using it, Knit One Below by Elise Duvekot.

Project: Flower Scarf by Robyn Diliberto
Yarn: 1 hank of  Classic Elite Fresco (164yds/50g, 60% Wool, 30% Alpaca, 10% Angora)
Needles: US 5/3.75mm; a 32" circular needle should cover all of your needs for this project.
Notes:
a) I decided to skip any of the crochet steps (edging the scarf and the buttonhole).
b) If you don't have any fiberfill handy for stuffing the button, then you could use a cotton ball. The button will seem a bit large to fit into the center of the flower, but it is squishy and fits well.
c) I used all my ends for securing both the button an the flower, working as a great jump start for weaving in ends.
d) When you are working your flower, I recommend using magic loop for your needling. As you work the outer rounds, you will not have much room to maneuver; so, you can let out a extra lengths of cable wherever it will make things more comfortable.


#32:
I have been itching to make something fun and crisp out of the great colors of Noro Kureyon. This hat, the Slippery hat, fulfilled that itch for the time being. Kureyon is not at all soft, but it is warm and beautiful. It is the sort of yarn that you use to make a hat that will warm the head of one who will appreciate its woolly goodness.

Project: Slippery Hat by Anne Lecrivain-Cozzoli
Yarn: 1 ball of Noro Kureyon (100% Wool, 110yds/50g)
Needles: US 5/3.75mm and US 9/5.5mm, 16" circulars, and US 9/5.5mm DPNs
Gauge:
Size: Fits a 20-22" head.
Pattern:
With smaller needle, CO 96.
Rounds 1-6: *K1, P1, repeat from * around
Round 7-12: With larger needle, *sl 1 wyif, K11, pm, repeat from * around.
Note: once the markers are placed in on Round 7, just slip them along as you come upon them.
Round 13-18: *K6, sl 1 wyif, K5, repeat from * around.
Repeat rounds 7-18 two more times.
Decrease rounds:
Round 1: *K10, K2tog, repeat from * around.
Round 2: *K9, K2tog, repeat from * around.
Round 3: *K8, K2tog, repeat from * around.
Round 4: *K7, K2tog, repeat from * around.
Round 5: *K6, K2tog, repeat from * around.
Round 6: *K5, K2tog, repeat from * around.
Round 7: *K4, K2tog, repeat from * around.
Round 8: *K3, K2tog, repeat from * around.
Round 9: *K2, K2tog, repeat from * around.
Round 10: *K1, K2tog, repeat from * around.
Round 11: *K2tog, repeat from * around.
Cut a tail (or use the tail that remains) and thread remaining stitches onto the tail and pull it up tight like pulling on a drawstring. Weave in the ends and enjoy!
© 2012 Anne Lecrivain-Cozzoli For Personal use only. Do not duplicate or distribute. Items made from this pattern should not be for resale, but can be used for charitable contribution or fundraising.

Sunday, December 18, 2011

Week 29 of 52: Appointment Hat, a 24 Stitch Hat


What can you do with US 19/15mm circular needles and 33 yds of bulky yarn?
This hat. It seems that I am on a quest to see just how few stitches one really needs to cast on and still end up with a hat. Here we have 24 sts and 15 rows. Karin dubbed it the Appointment Hat the moment she saw it, imagining that she could whip one up as she waited for her turn at any given appointment.
Yarn: 1 ball of Gedifra Benevito (33 yds/50g; 50% Wool, 40% Acrylic, 10% Alpaca)
Note: If you decide that you want it longer, then you will need a second ball or a yarn with more yardage in the same weight. It is very stretchy and covers most of my ear when I pull it on.
Needles: US 19/15mm 16" Circular and matching double pointed needles OR US 19/15mm 32" or longer (for magic loop)
Gauge: 4 stitches= 3 inches
Cast on 24 sts. Join in the round as you work round 1.
Round 1 and 2: *K2, P2, repeat from * around; the first time around remember to place a marker to indicate the beginning of the round.
Round 3 and 4: *P2, K2, repeat from * around.

Repeat rounds 1-4 two more times. (If you are going to make it longer, then repeat 1-4 one more time after that.)

Decrease rounds:
Round 1: *K2, P2tog, repeat from * around (18 sts)
Round 2: *K2, P1, repeat from * around
Round 3: *K2tog, repeat from * around (9 sts)

Cut a tail (or use the tail that remains) and thread remaining stitches onto the tail and pull it up tight like pulling on a drawstring. Weave in the ends and enjoy!

© 2011 Anne Lecrivain-Cozzoli For Personal use only. Do not duplicate or distribute. Items made from this pattern should not be for resale, but can be used for charitable contribution or fundraising.

Wednesday, April 13, 2011

Free Pattern: Easter Basket


This month's free pattern is just in time for Easter. Add these cute eggs and their basket to your decorations, or make them for your favorite little one to play with! The yarn does all the work itself, so you don't have to keep changing colors to get those cute stripes.

download now

Easter Eggs:
1 ball Sirdar Snuggly Crofter DK, color #158 “Florrie”
US Size 4 DPNs, set of 4
Fiberfill Stuffing
Gauge: 5.5sts/inch in stockinette stitch

Pattern:
Cast on 9 sts, divide onto 3 needles, 3 on each

Increase Section:
Increase Round 1: *Kfb, repeat from * to end. [18 sts]
Knit 1 round.
Increase Round 2: *Kfb, k1, repeat from * to end. [27 sts]
Knit 1 round.
Increase Round 3: *Kfb, k2, repeat from * to end. [36 sts]
Knit 1 round.
Increase Round 4: *Kfb, k3, repeat from * to end. [45 sts]

Work even in stockinette stitch (knit every round) for 12 rounds.

Decrease section:
Decrease Round 1: *SSK, k3, repeat from * to end. [36 sts]
Knit 2 rounds.
Decrease Round 2: *SSK, k2, repeat from * to end. [27 sts]
Knit 2 rounds.
Decrease Round 3: *SSK, k1, repeat from * to end. [18 sts]
Knit 2 rounds.
STOP: Using fiberfill, stuff egg firmly.
Decrease Round 4: *SSK, repeat from * to end. [9 sts]

Cut yarn and pull through remaining stitches on needle, cinching it up tight. Make a knot at the base to keep it tight, and weave end down inside egg.


Easter Basket:
1 ball Sirdar Snuggly Kisses DK color #751 “Twiggy”
US Size 7 DPNs, set of 5
US Size 7 16” Circular Needle
Gauge: 4 sts/inch in stockinette stitch

Pattern:
Cast on 8 sts using 2 strands of yarn held together. Divide onto 4 needles, 2 on each.

Increase Section:
Increase Round 1: *Kfb, repeat from * to end. [16 sts]
Knit 1 round.
Increase Round 2: *Kfb, k1, repeat from * to end. [24 sts]
Knit 1 round.
Increase Round 3: *Kfb, k2, repeat from * to end. [32 sts]
Knit 1 round.
Increase Round 4: *Kfb, k3, repeat from * to end. [40 sts]
Knit 1 round.
Increase Round 5: *Kfb, k4, repeat from * to end. [48 sts]
Knit 1 round.
Increase Round 6: *Kfb, k5, repeat from * to end. [56 sts]
Knit 1 round.
Increase Round 7: *Kfb, k6, repeat from * to end. [64 sts]
Knit 1 round.
Increase Round 8: *Kfb, k7, repeat from * to end. [72 sts]
Knit 1 round.

Change to circular needle

Purl 2 rounds

Work in Stockinette Stitch (Knit every round) for 18 rounds.
Purl 1 round
Knit 1 round
Purl 1 round

Bind off all stitches in Knit.

Handle:
Using 2 size 7 DPNS, cast on 3 stitches using 2 strands of yarn held together.
Work in I-cord until piece measures 10”
K 3 together, cut yarn and pull through last stitch to secure.

Finishing:
Weave in all ends on basket.
Attach I-cord handle to top of basket using tails to sew it on.

Wednesday, March 16, 2011

Free Pattern: Springtime Baby Cardi


This month's free pattern is the Springtime Baby Cardi that is quick to knit out of 1 skein of Berroco Weekend, an easy care Cotton and Acrylic blend, perfect for baby items!

It seems that so many people I know are having babies, and most of them are due for springtime! Pick out a cute pastel color and some matching springtime buttons and you'll have the perfect quick knit for upcoming baby showers!

download now

Size: 3 months (6 months, 12 months)

Materials:
Berroco Weekend; color: “Clothesline” #5926; 1 (2, 2) skeins
US Size 7 24” circular needles (OR SIZE NEEDED TO OBTAIN GAUGE)
Stitch Markers
4 buttons

Gauge: 20 stitches = 4 inches in Stockinette Stitch

Abbreviations:
K: Knit
P: PurlSt St: Stockinette Stitch
WS: Wrong Side
RS: Right Side
M1: Make One
St(s): Stitch(es)
SSK: Slip Slip Knit
K2TOG: Knit 2 Together
YO: Yarn Over

Seed Stitch (with odd number of stitches):
Row 1: *K1, P1, repeat from * to last stitch, K1.
Repeat Row 1 to desired length.

BACK:
Cast on 47 (49, 51) stitches
Work in seed stitch for 1 inch
Change to stockinette stitch and work until piece measures 6 (6.25, 6.5) inches. Mark last stitch on each side of work. Resume working in St st until piece measures 9.5 (10, 10.5) inches from cast on edge, ending with a WS row.

Next row: K12, bind off next 23 (25, 27) stitches, K12. Place first 12 stitches on a holder and work each side separately.

LEFT FRONT:
Row 1 (WS): P all sts
Row 2 (RS): K1, M1, K to end of row.
Repeat these 2 rows until you reach 23 (25, 27) sts total.

AND AT THE SAME TIME: When work measures 13 (13.5, 13.75)” from cast on edge, mark last stitch on each side of work.

After increasing is complete for the neck line, continue working in st st until front measures 8.5 (9, 9.5) inches. Work 1 inch of seed stitch, bind off in pattern.

RIGHT FRONT: Re-join yarn at other front, ready to work a WS row
Row 1 (WS): P all stsRow 2 (RS): K to last st, M1, K1.
Repeat these 2 rows until you reach 23 (25, 27) sts total.

AND AT THE SAME TIME: When work measures 13 (13.5, 13.75)” from cast on edge, mark last stitch on each side of work.

After increasing is complete for the neck line, continue working in st st until front measures 8.5 (9, 9.5) inches. Work 1 inch of seed stitch, bind off in pattern.

SLEEVES: Pick up and knit 35 (37, 39) stitches between two markers on one side edge.
*Work 5 rows of st st.
Next row (Row 6, RS): K1, SSK, K to last 3 sts, K2TOG, K1.

Repeat from * (work 5 rows st st, work decrease row) until sleeve measures approx. 5(5.5, 6.5) inches from picked up stitches.

Work 1 inch in seed stitch, bind off in pattern.

Work second sleeve the same way, picking up the sts between the markers on the other side of the garment.

NECK AND BUTTON BAND:
With RS facing you and starting at the bottom edge of the right front, pick up and knit 3 sts for
every 4 rows up along the side of the front, pick up and knit 1 st for every bound-off st at the back of the neck, and pick up and knit 3 sts for every 4 rows down along the edge of the other front.

The exact number of sts you have is not too critical, as long as you picked them up at this ratio, and you should end with an odd number of sts.

Work in seed stitch across all sts for 3 rows (2 rows if making sweater for BOY). On 4th (3rd for boy) row:
Buttonhole Row: *K4, K2TOG, YO, repeat from * 3 more times. Complete row as normal, continuing in seed stitch as set.
If making sweater for GIRL: Bind off on next row all sts in pattern.
If making sweater for BOY: Work 1 more row seed stitch, bind of on next row all sts in pattern.

FINISHING:
Sew side and sleeve seams. Weave in all ends on WS. Sew buttons on opposite of button holes. Block if desired.


Tuesday, January 18, 2011

Free Pattern: Fishtail Braid Cowl!

This month we have another great free pattern for you, the Fishtail Braid Cowl, by Karin Wilmoth. Karin works and teaches here at the shop, and her new cowl design is really really pretty! With 2 skeins of Misti Alpaca's new naturally dyed "Best of Nature" Chunky, you can whip up this cute and quick cowl to keep you all warm and snuggly!

Fishtail Braid Cowl
download now


Materials
2 skeins (1 each of 2 colors) Misti Alpaca Best of Nature (109 yards, 100 grams per hank), or equivalent
yardage of Chunky wt. Yarn, US 19, 24” circular needle, a stitch marker, & a blunt tapestry needle.

Gauge
16 st. to 4 in. in pattern


Finished Size
11 inches wide and 30 inches around

Terms
k2tog – knit two stitches together
k2tog tbl – knit two stitches together through the back loops

Pattern
With Color A (whichever color you wish to begin with), cast on 120 stitches. On the first round you will join
your knitting in the round, being carfeul not to twist the stitches. Place marker.

Round one – *K2tog and slip the first stitch only off the needle, leaving the second stitch on the left needle.
Repeat from * around to last stitch. Slip last stitch to right needle, remove marker, replace st onto left
needle, k2tog and slip first st only off the needle. Replace marker.

Switch to Color B, but do not cut Color A. You will carry each color up, switching as needed.

Round two - *K2tog tbl and slip the first stitch only off the needle, leaving the second stitch on the left
needle. Repeat from * around to last stitch. Slip last stitch to right needle, remove marker, replace st onto
left needle, k2tog tbl and slip first st only off the needle. Replace marker.

Work Round one with Color B, then switch to Color A and work a Round two, then a Round A again. In this
way you will work two rounds of each color, switching colors for 31 rounds.

Bind off in pattern – K2tog tbl and slip the first stitch off the needle – 2 x, pass the first stitch on right needle
over and off. * K2tog tbl and slip the first stitch off the needle, pass the first stitch on right needle over and
off. Repeat from * until 2 stitches remain. K2tog tbl and bind off last stitch. Cut yarn and pull it through
last stitch.

Weave in the ends, and lightly block.

Monday, December 6, 2010

Countdown to Knitmas: Day 6!


Today I bring you the 56 Stitch Hat. I have been looking for a good excuse to use new Mirasol Ushya and a hat for my husband was just that excuse.

It works up lickety split (an evening worth of work).

Need a quick hat? You can download it here.

Yarn: 1 hank of Mirasol Ushya (114 yds/100g; 98% Merino and 2% Nylon)

Gauge: 2.5 sts/in

Needles: US13/9mm 16” circular and DPNs or needle size to obtain gauge

Finished Size: 22” head circumference; fits a 22”-25” head comfortably

Tools: Stitch Markers